Nuxt4にCKEditor5を追加する
- 掲載日
- 更新日
CKEditor5は積極的なアップデートが行われており、ネットに転がっているNuxt環境でのCKEditor5のインストール方法は情報が古くなっていたので2026年5月18日現在の追加方法です。
CKEditor5をインストールする
- まず、CKEditor5を追加したいNuxt環境でCKEditor5をインストールします。
npm install ckeditor5 @ckeditor/ckeditor5-vue
// yarn 使ってるなら yarn add ckeditor5 @ckeditor/ckeditor5-vue でもOKckeditor.vue(ファイル名は何でもいいです。)コンポーネントを作ります。
<script setup lang="ts">
import { computed } from 'vue'
import {
InlineEditor, // 入れたいEditorの種類によって変更する
Essentials, Paragraph, Bold, Heading,
// ... ( ここに必要なCKEditor5の機能を追加して読み込む )
} from 'ckeditor5'
import coreTranslations from 'ckeditor5/translations/ja.js'
// ツールバー等を日本語にする
import { Ckeditor } from '@ckeditor/ckeditor5-vue'
import 'ckeditor5/ckeditor5.css'
const config = computed(() => {
return {
licenseKey: 'GPL', // ここは環境に合わせて適切なライセンスコード入れる。個人ならGPLでOK
plugins: [
Essentials, Heading, Paragraph, Bold
// importと同じ内容
],
toolbar: [
'sourceEditing',
'|', 'undo', 'redo',
'|', 'heading',
'|', 'bold', // importに合わせる。importしてない機能は使えないので注意。
],
translations: [
coreTranslations, // 日本語化
],
}
})
const content = ref("This is Test");
</script>
<template>
<ckeditor
v-model="content"
:editor="InlineEditor"
:config="config"
/>
</template>- コンポーネントをCKEditor5を埋め込みたいページ上で、
ClientOnlyで囲んで上記コンポーネントを追加します。
<script setup lang="ts">
import Ckeditor from './ckeditor.vue';
</script>
<template>
<div>
<ClientOnly>
<Ckeditor />
</ClientOnly>
</div>
</template>
Props / Directives(主要なプロパティ・設定)
詳細は公式HPのvueの項目に書いてある通りですが、よく使うプロパティについて解説します。
editor
エディタのタイプを指定できます。
詳しくは公式の「Editor types」にありますが、2026年5月18日現在は以下の5パターン
- Classic editor
ワードプレスなどでよく見かける形式。
ツールバーが上部や下部に固定して表示されるため、エディタがどこにあるかはっきりと分かる。 - Inline editor
入力欄をサイトの途中などにインライン形式で入れ込み出来、入力欄をアクティブにしないとツールバーが表示されない形式。
実画面をプレビューしながらエディタ操作するようなUIを提供する時に使いやすいです。
なお、このサイトではインラインエディタを使用していますが、2026年5月18日現在の最新のNuxt(vueでも?)とCKEditor5では上述の方法では以下のエラーが出て動きません(!)。
CKEditorError: editor-create-attachto-ignored以下のようにマウントした後に生のjsの書き方でインスタンスを作成する必要があります。
(公式のビルドツールの書き方が間違ってる状態なので、そのうち直るとは思います。)
<script setup lang="ts">
import { ref, onMounted } from 'vue';
import { InlineEditor, Essentials, Paragraph, Bold } from 'ckeditor5';
import 'ckeditor5/ckeditor5.css';
const editorElement = useTemplateRef('editorElement');
const editorInstance = ref<InlineEditor | null>(null);
onMounted(async () => {
try {
if (editorElement.value == null) {
return
}
let _editorInstance = await InlineEditor.create(editorElement.value, {
plugins: [ Essentials, Paragraph, Bold ],
toolbar: [ 'undo', 'redo', '|', 'bold' ],
licenseKey: 'GPL',
initialData: '<h2>Hello Inline Editor!</h2>'
});
editorInstance.value = _editorInstance;
} catch (error) {
console.error(error);
}
});
</script>
<template>
<div ref="editorElement"></div>
</template>
- Balloon editor and balloon block editor
インラインエディタと似ていて、入力欄のカーソルがあたっている場所にバルーンレイアウトでツールバーを表示できます。
これも現在はInlineEditorと同じでmount後にインスタンス生成する必要がある。 - Decoupled editor (document)
ツールバーと編集領域が分かれていて、Word風のレイアウトで修正できる形式。
ドキュメント編集に適しているらしい。
これも現在はInlineEditorと同じでmount後にインスタンス生成する必要があり、
ツールバーを追加する手順がちょっと大変でした。
<script setup lang="ts">
import { ref, onMounted } from 'vue';
import { DecoupledEditor, Essentials, Paragraph, Bold } from 'ckeditor5';
import 'ckeditor5/ckeditor5.css';
const editorElement = useTemplateRef('editorElement');
const editorToolbar = useTemplateRef('editorToolbar');
const editorInstance = ref<DecoupledEditor| null>(null);
onMounted(async () => {
try {
if (editorElement.value == null) {
return
}
let _editorInstance = await DecoupledEditor.create(editorElement.value, {
plugins: [ Essentials, Paragraph, Bold ],
toolbar: [ 'undo', 'redo', '|', 'bold' ],
licenseKey: 'GPL',
initialData: '<h2>Hello Inline Editor!</h2>'
}).then( editor => {
const toolbarContainer = editorToolbar.value;
toolbarContainer.appendChild( editor.ui.view.toolbar.element );
overrideDropdownPositionsToNorth( editor, editor.ui.view.toolbar );
overrideDropdownPositionsToNorth( editor, editor.plugins.get( 'FormattingOptions' ).toolbarView );
overrideTooltipPositions( editor.ui.view.toolbar );
overrideTooltipPositions( editor.plugins.get( 'FormattingOptions' ).toolbarView );
})
editorInstance.value = _editorInstance;
} catch (error) {
console.error(error);
}
});
</script>
<template>
<div class="editor-box">
<div class="editor-toolbar" ref="editorToolbar"></div>
<div class="editor-container-wrapper">
<div class="editor-container" ref="editorElement"></div>
</div>
</div>
</template>
<style lang="css">
.editor-box {
border: 1px solid #000;
background-color: #9999;
}
.editor-container-wrapper {
width: 60%;
margin: 30px auto;
border: 1px solid #000;
background-color: #fff;
}
</style>- Multi-root editor
複数のエディタを分けて表示できる形式。
上記四つでも似たようなことは出来ますが、こっちを使うとundo、redo等が共通で使えるようになるとのこと。
(一つ目のエディタで編集→二つ目のエディタで編集→一つ目のエディタに戻ってundo機能を使うと、二つ目のエディタで行った修正がひとつ前に戻る。)
複雑なレイアウトのページの編集用途等で使う?と思われます。
※ プレミアムプランじゃないと使えないので導入方法など試しておらず詳細は不明です。
tag-name
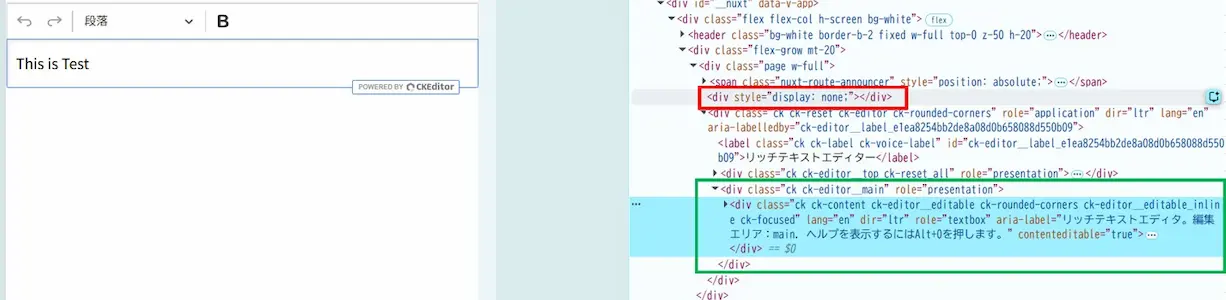
ckeditorコンポーネントはまずdiv要素(図の赤枠)部分を展開し、その中身をcontenteditable="true"なdivタグ(図の緑枠)として展開するような動きをとる?ようです。
図の赤枠の方の要素を、textareaタグ等div以外のタグを指定できるみたいですが、正直何の用途かよく分からないです。CKEditor4時代まではtextareaで展開していたと思うので、その辺りの都合なのでしょうか?
※ ClassicEditorのみ?InlineEditor等では別に要素を持たないため使えないような気がします。現状コンポーネント使えないので不明。
v-model
vue使っている人にはいわずもがなという感じですが、変数を入れることで、エディタの入力欄の内容を連動して扱えます。
model-value
v-modelと違って、双方向でないバインディング(以下のような実装をして、エディタで内容を変更後に変数の中身を見ても初期値のままになる)が出来るディレクティブです。
公式の解説的にユーザーの編集毎にこちらで記述した処理を挟ませたい場合や、文章の量が多くて都度更新していると処理が重くなるケースなどで使う想定と思われます。
<template>
<ckeditor :editor="ClassicEditor" :model-value="data" />
</template>
<script setup>
import { ref } from 'vue';
import { ClassicEditor } from 'ckeditor5';
import { Ckeditor } from '@ckeditor/ckeditor5-vue';
const data = ref( '<p>Hello world!</p>' );
</script>config
エディタの各種設定値を渡せます。詳細は公式HPにあります。
ツールバーの並び順を変えたり、アイコンの間に仕切りを建ててグループごとにまとめて配置したり、画像のアップロード設定や、許可するHTMLタグ設定などを行えます。
自作プラグインやコマンドを読み込むのもここになるので、カスタマイズする場合まずここを触ることになると思います。
disabled
trueにするとエディタが編集不可状態になります。(inputタグとかと同じですね。)
特定のボタンを押した際等にエディタを使用不可にしたい時などに使用すると思われます。
disable-two-way-data-binding
双方向バインディングを無効にする設定で、デフォルトではfalseです。
The reason for introducing this option is performance issues in large documents. After enabling this flag, the
v-modeldirective will no longer update the connected value whenever the editor’s data is changed.
とあるため、大規模なデータ編集を行う人向けの設定と思われます。
(入力の度にv-modelを更新したくないという話だと思います。長文を編集する場合、editor.getData()関数を使って、必要なタイミングでだけ入力内容を取得することを推奨しているようです。)
watchdog-config
CKEditor5では、エディタがクラッシュすると再起動を行うようです。
その際の再起動のリトライ回数とリトライ間隔を以下のように設定できます。
const watchdogConfig = {
crashNumberLimit: 5,
minimumNonErrorTimePeriod: 2000
};disable-watchdog
上記のクラッシュ時の再起動処理を無効化する設定でデフォルトではfalseになっています。
クラッシュ時に再起動して欲しくない場合trueにするという事だと思います。
(クラッシュ時には再起動するより自前でエラーハンドリングしたい時に使うのかな?と思います。)
Component events(コンポーネントイベント)
こっちも詳細は公式HPにある通りです。エディタの各種状態の変化をイベントとして受け取れます。通常のJavaScriptのネイティブイベントに近い感覚でハンドリングが可能です。
ckeditor.vueを以下に変更でざっくり試せます。
<script setup lang="ts">
import { computed } from 'vue'
import {
ClassicEditor,
Essentials, Paragraph, Bold, Heading,
// ... ( ここに必要なCKEditor5の機能を追加して読み込む )
} from 'ckeditor5'
import coreTranslations from 'ckeditor5/translations/ja.js'
// ツールバー等を日本語にする
import { Ckeditor } from '@ckeditor/ckeditor5-vue'
import 'ckeditor5/ckeditor5.css'
const config = computed(() => {
return {
licenseKey: 'GPL', // ここは環境に合わせて適切なライセンスコード入れる。個人ならGPLでOK
plugins: [
Essentials, Heading, Paragraph, Bold
// importと同じ内容
],
toolbar: [
'undo', 'redo',
'|', 'heading',
'|', 'bold', // importに合わせる。importしてない機能は使えないので注意。
],
translations: [
coreTranslations, // 日本語化
],
}
})
const content = ref("This is Test");
const editor = useTemplateRef('ckeditor')
const onReady = function () {
console.log("Readyイベントが発火したよ。");
}
const onFocus = function() {
console.log("Focusイベントが発火したよ。")
}
const onBlur = function() {
console.log("Blurイベントが発火したよ。")
}
const onInput = function() {
console.log("Inputイベントが発火したよ。")
}
const onError = function() {
console.log("Errorイベントが発火したよ。")
}
const onDestroy = function() {
console.log("Destroyイベントが発火したよ。")
}
const upError = function() {
editor.value?.instance?.commands.execute('存在しないコマンドを実行')
}
const upDestroy = function() {
editor.value?.instance?.destroy()
}
</script>
<template>
<ckeditor
ref="ckeditor"
v-model="content"
:editor="ClassicEditor"
:config="config"
@ready="onReady"
@focus="onFocus"
@blur="onBlur"
@input="onInput"
@error="onError"
@destroy="onDestroy"
/>
<button @click="upError">
エラーを起こすボタン
</button>
<button @click="upDestroy">
インスタンス削除ボタン
</button>
</template>
ready
CKEditorが準備出来た時に発火する処理を指定できます。
focus
CKEditorにフォーカスを合わせた時に発火する処理を指定できます。
input
CKEditorに入力があった時に発火する処理を指定できます。
blur
CKEditorのフォーカスが解除された時に発火する処理を指定できます。
error
CKEditorにエラーが発生した時に発火する処理を指定できます。
存在しないコマンドを実行すると簡単に再現できます。
GIFを見ると分かる通り、エラーイベントが発生→watchdogの項目の通り一度インスタンスを再生成するため、@error → @destroy → @input→ @readyというように他のイベントが発生しているため注意が必要です。
destroy
CKEditorインスタンスを破壊した時に発火する処理を指定できます。
destroyコマンド実行で発火できます。
参考
- Integrating CKEditor 5 with Nuxt from npm
公式の入れ方、一番シンプル。

この記事を書いた人
- A.W.
- 茨城県在住Webエンジニアです。 PHP、PostgreSQL、Linuxなどを業務で使用しています。 趣味ではGoやNuxt、Flutterをやってます。


